Sprouts have been around for years. I have found them served on salad bars and packaged in grocery stores, but I have never tried them. Recently, I have discovered their true value as an extremely healthy food, packed full of vitamins and growing them is such an easy process. So easy in fact, that you could do this weekly to have a continuous supply of fresh sprouts! In spite of their benefits, I’ve been dragging my feet about trying to grow them. You see, I am not too adventurous when it comes to food. But things change, so here we go…..
Seeds You Can Sprout in a Jar
Most bean seeds can be sprouted, as well as peas, lentils, alfalfa seeds and rice. (It’s NOT recommended to sprout red kidney beans as they contain a very toxic lectin called phytohaemagglutinin.) You can also sprout edible seeds, such as sunflower and pumpkin seeds.
There are some seed sprouts that you CANNOT eat. Tomato and other nightshade seeds should never be sprouted. When buying seeds, purchase seeds specifically intended for sprouting or micro greens, because they are untreated. If you would like to use regular packaged garden seeds, look for seeds that are not treated with any fungicide such as Thyram. Organic garden seeds are probably a safe choice. Just be sure to read the packages.
Filtered water is recommended. If you have to use tap water, boil and then cool before using. (I’d suggest making up a 1/2 – 1 gallon at a time.) Wash hands and utensils in hot soapy water and be sure jars are well sanitized. Rinse jars with boiling water and let cool. Do not reuse the drained water for the sprouts, but you could use it to water plants.
DIY Sprouting Jars
These are so simple to make! Use plastic needlepoint canvas that 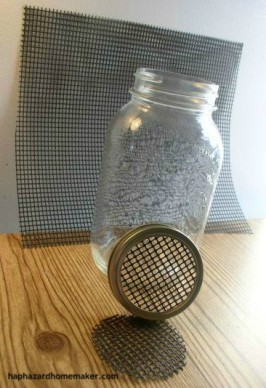 can be found in many colors in craft departments of big box stores and craft supplies stores. Wide mouth jars or jars with no “shoulders” work a little better for both draining and removing sprouts. I used regular jars here, because I didn’t have any empty wide mouth jars available for use.
Use the flat lid as a pattern and draw circles on the plastic canvas with a marker and then you can cut them out with regular scissors. The plastic circle should fit snugly inside the ring. You can get a bunch out of one sheet if you trace your circles close together. And there you go . . . super easy and super cheap inexpensive!
Be sure to wash the plastic well before using.
Sprouting in a Mason Jar
General Instruction:
- Rinse your seeds well a couple of times with filtered water, and place them in sprouting jar.
- Cover the seeds in the jar with 1 cup of filtered water.
- Place cheese cloth on the top of the jar (or use a sprouting lid) and secure with a rubber band.
- Let the jar sit overnight
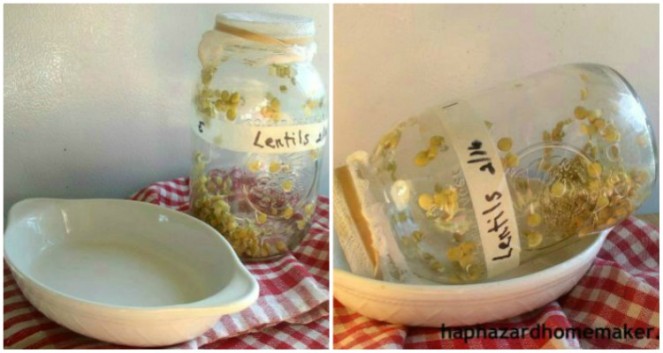
- Pour off the water, refill and drain jar again, leaving the seeds damp. You can add water through the screen without removing the lid to make it easier. Set the jars upside down in a dish drainer or on a cooling rack for 10- 15 minutes to drain excess water. (See the picture below)
- Move the jar to a “draining rack”. You can use any bowl or dish that allows the jar to sit at an angle to continue draining, such as the dish pictured above, for a few hours.
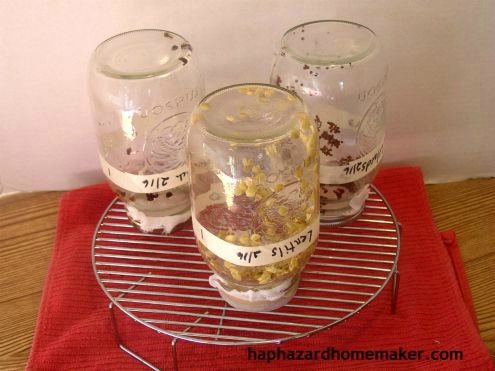
- Repeat “Step 5” 2 – 3 times daily (every 6 – 8 hours) using fresh water each time to prevent bacteria growth.
- Repeat this process for three days or until you see two leaves emerge. Depending on which seeds used, this could take 1 – 7 days.
- Place them in indirect or partial sunlight to let them green up.
- After another day or two of rinsing and draining, they are ready to prepare to store in the refrigerator.
- To remove the hulls of the seeds, place the sprouts in a bowl of clean water. Gently pull the mass of sprouts apart to allow the seed hulls to float to the top. Skim the floating hulls and dispose. Rinse the sprouts again and return them to the jar and replace the covering. Drain the jar for a few hours so that the sprouts dry a bit.
Harvesting, Storing and Eating Sprouts
Keep the jars out of direct sunlight.
When they are ready for harvesting, rinse them well and then put them in a plastic bag in the fridge. They should stay fresh for a week. Rinse well before consuming.
You can eat them raw. Or add them to cooked dishes the last 2-3 minutes of cooking time. Use them in casseroles, scrambled eggs, soups, or add fresh sprouts to salads or sandwiches.
Precautionary Warning: Although sprouts are a nutritional power package, unsanitary conditions could result in salmonella or E.coli developing.
For additional information, check out Mother Earth News for the best Sprouting Chart that I have seen.


Hello. I found this recipe very interesting. Because I am trying to learn how to do things on my own. This is a great idea, Will be going to store to buy some mason jars. Look forward to reading more of your posts.
LikeLiked by 1 person
Thank you. This is so easy and so fun to watch them grow. You can use any regular jar. I just had some empty canning jars available.
LikeLiked by 1 person