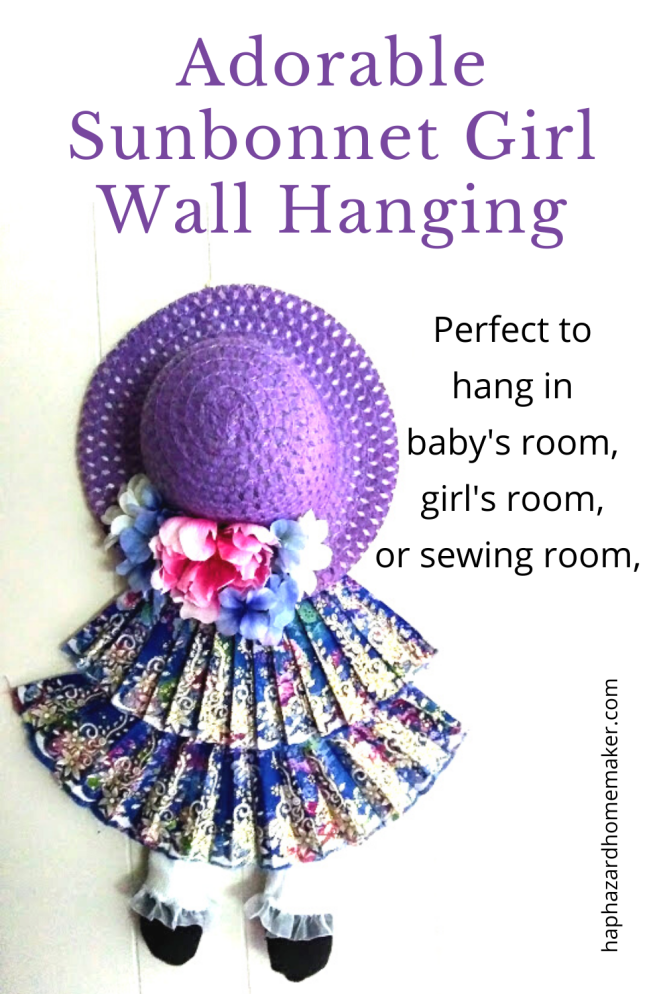
This adorable Sunbonnet Girl wall hanging is reminiscent of a popular quilt pattern from years past. It’s so easy to make and would look adorable in a little girl’s room. Or even a big girl’s room, especially if she’s a quilter, seamstress or doll collector. Plus it only took 15 or 20 minutes to make. I bought most of my supplies at Dollar Tree, so it’s also pretty inexpensive.
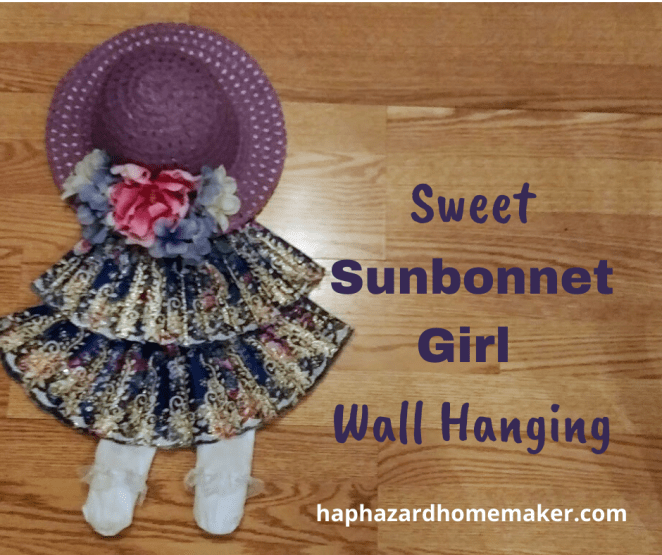
Don’t let all of the steps scare you off. Basically everything just needs to be prepared first and then glued down in layers. I included photos below the written directions and numbered them for a few of the steps that I thought a visual would be helpful.
Sunbonnet Girl Supplies
The basic supplies are:
- 2 matching folding fans
- child’s size hat to match the fans
- 1 pair socks (mine had a ruffled edge)
- a few silk flowers to match the fans
- 1 foam core board
- a few craft sticks
- hot glue sticks
- scissors
- wire cutters
Optional supplies:
- a little stuffing (fiber fill, cut up plastic grocery bag, paper towel)
- hair (ideas: deco mesh ribbon or yarn)
- light pink socks for hands
- black socks for shoes (or color to match the fans)
- 1″ eyelet or lace for petticoat
Word of caution on the fans: open the fans up to be sure they open up to the same size and there are no major defects in the fabric edges. These fans were pretty busy looking, so I decided not to do hair and bows.
Sunbonnet Girl Directions
- Carefully cut the metal loop off the fan. The fan still needs to stay intact.
- Carefully pull the fabric off the 2 outer fan ribs of each fan.
- Then cut the ribs off the “hinged” end leaving about 1″ intact.
- Glue the raw edges (the ones you just peeled off the ribs) back for a finished look.
- Open up the fans (fabric side down) with the lower skirt portion on top side. Now, carefully flip the fans over so you can make sure none of the plastic of the lower fan shows. You need to use a few drops of hot glue to tack the 2 fans together so you can position and glue the crafts sticks in place to hold the fans open in desired position.
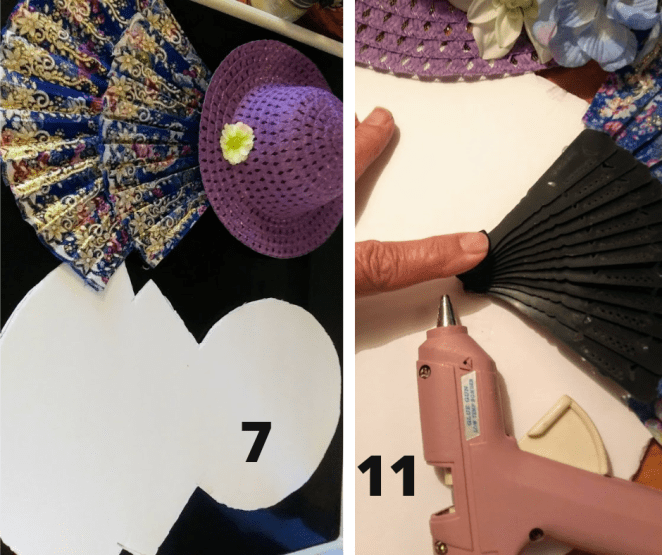
- Once your hot glue is dry, lay your fan assembly fabric side up on the foam core board and lay the hat in the desired location, making sure it covers the plastic part of the top fan. Using a pen, mark around the entire fan and hat area.
- Cut the foam core board about 1/8″ inside the line. I cut it out with scissors and it flattened the edges a bit, but it’s not noticeable from the front.
- Prepare the hands if adding to your wall hanging by adding a little stuffing (fiber fill, cut up plastic grocery bag, paper towel) to the pink socks. It only has to be enough for them to maintain their shape. Apply hot glue inside the top of the 2 socks to hold closed. Place the hands on the sides of the foam board where the hands should be, about where the bottom of the top fan edge would be. Glue to foam board.
- Prepare the feet by adding a little stuffing to the white socks. If adding shoes, cut a few inches off the toe end of the colored socks. Slide these cut off pieces over the stuffed white socks and add a little glue to hold in place. Fold the white socks down to cover the top of the “shoes”. Apply glue inside tops of white socks to close. Position the white socks in place on the bottom of the foam board and apply glue to hold in place.
- If adding a petticoat, cut a length of eyelet or lace to glue across the bottom edge of the foam core board with an extra 1/2″ on each end to fold under and glue.
- Next, start on one side of the fans, very carefully and slowly, and working only a few inches at a time, start applying hot glue along the edge of the foam core board, and pressing the fan edges down to the glue. Be sure to add glue on top of the socks and eyelet as you work your way around the foam core. Add a little extra hot glue at the top edge of the fan.
- This is the point to add hair, if desired. Deco mesh ribbon can be cut and coiled to form big curls, or thick yarn can be used to make big braids. Hot glue in place right above the plastic part of the fan.
- Cut a 7″ piece of string or twine, fold in half, and tie a knot in the loose ends. Hot glue the knot end in place in the center of the back (on the front side) leaving 1/2″ to 1′ sticking up above the foam core board for hanging.
- Now position the hat in place and then hot glue around the hat shape on the foam core board.
- Take the blooms off the flower stems and glue in place. If desired, add a bow.


The photo at the bottom of this page shows the “shoes” that were described in step 9.
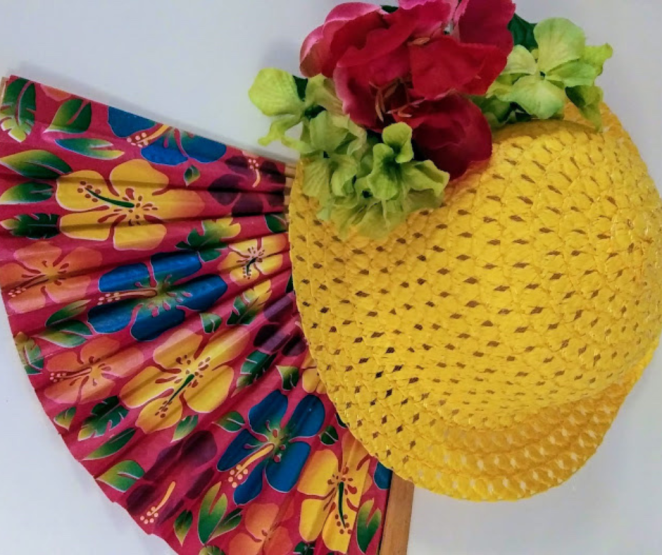
One thing about crafting, sometimes you just have to go with what you can find. I wanted to make a Sunbonnet Girl with something similar to the fan below, that I had bought several years ago. It’s a little larger than the current Oriental fans, but has a wooden frame instead of plastic. Both of my Dollar Trees only had the Oriental print fans. Only one of my nearby Dollar Trees had children’s hats, so I went ahead and bought the yellow hat too, just in case I run across the larger fans.
I might sew a 4′ wide fabric ruffle, and then cut the foam core board about 3″ longer, so I can glue the fabric ruffle on like a petticoat. What do you think?
I hope you enjoyed this project and I would love to see photos of yours.

What a coincidence! I have two of them hanging in my man cave, right between my signed Joe Frazier boxing poster and my Vintage Olympic Bobsled.
LikeLiked by 1 person
Oh, you are so funny! 😀 But if you’d like, I could send your Honey directions to make the little boys to match the girls.
LikeLiked by 1 person
You talking about cupcake? Who do you think got the autographed Joe Frazier poster?
LikeLike
Ok, either your reply went over my head, or you actually have 2 sunbonnet girls hanging between the poster and the bobsled. 🙂 (I was talking about cupcake)
LikeLike
Cupcake is Cupcake Cache. I think you follow her? She is my wifey…so when I say Cupcake, it is her. I have none of those items. I was just saying that Cupcake is into boxing and would not make me a doll to go next to a poster of Joltin Joe Frazier.:):) I do have a man cave, though. The dominant features are a large TV and a couch.
LikeLiked by 1 person
Gotcha! I would never have guessed that your wife was into boxing. I need to catch up on reading both of your blogs. I have really fallen behind reading on a lot of my favorite bloggers. Hope you are doing well!
LikeLike
Well, he remembers my story of attending matches at Madison Square Garden courtesy of one of my jobs. I actually used the character of the boxer in my short stories and researched it again. I also attended tennis matches, so….anyway….thanks for the mention.
LikeLiked by 1 person
I have fallen so far behind blog reading. Hoping to catch up soon! Take care!
LikeLiked by 1 person
That’s so pretty! I remember the sun bonnet girl quilts my grandmother used to make. What a blast from the past! 💜😀
LikeLiked by 1 person
My grandmother’s quilts were the first thing I thought of.
LikeLiked by 1 person
This is absolutely adorable!!!
LikeLiked by 1 person
Thank you! I had a lot of fun making it.
LikeLiked by 1 person
SO cute!
LikeLiked by 1 person
Thank you! Hope you are doing well! 🙂
LikeLiked by 1 person
Yes we are, thank you Robin. Stay safe and healthy!
LikeLiked by 1 person
This is so adorable. I have some tiny hats, maybe I can make mini ones to hang on our tree for Christmas.
LikeLiked by 1 person
Thank you! Mini versions would be so cute! ❤
LikeLike
So very sweet!
LikeLiked by 1 person
Thank you 🙂
LikeLike
Wow – this is so cute
LikeLiked by 1 person
Thank you 🙂
LikeLiked by 1 person
My absolute pleasure
LikeLiked by 1 person
Nice blog 💕
LikeLike
Thank you! 💞
LikeLiked by 1 person
My pleasure, followed you 💕
LikeLiked by 1 person