I have been ever so slowly switching over to glass jars for food storage. I love the look of the jars lined up on shelves, because the shelves look so neat and organized. However, some of the things needed to be labeled, so that whoever is cooking doesn’t grab the wrong item. This is such a simple way to make labels, without spending a lot of money, or using a ton of printer ink. It doesn’t take much time or effort, but the results are pretty darned cute, if I say so myself.
This whole blogging thing isn’t as easy as it appears on the surface. It is so much more than writing a few paragraphs and posting it out there on world wide web. One of the biggest issues I am having is with my photography skills and the resulting pictures I include in the posts. I feel like I am getting better, even though I don’t have an “idiot-proof” camera.
With that being said…when I wrote the post on the Homemade Brown Gravy Mix, I measured the ingredients for the prepared mix in to the jar that I have been using for a couple of years. Once that post was out there for the world to see (ok, maybe just a few friends), the picture of that plain, yet functional jar bothered me. Like, REALLY bothered me! It just looked pitiful.
So….I finally pulled up a stool to the counter to finish the labeling project I started last year. Not totally finished at this point, but one section is done so that I can share with you.
DIY Labels Supply List
I wanted the chalkboard look, so I bought the  black tape and folder, and used a white paint pen. But you could sure use any other colors to match your kitchen.
- vinyl folder ($1.50 or less)
- roll of chalkboard tape ($5)
- paint pen ($2 or less)
- roll of jute twine ($1)
- scissors
- pencil
How to Make Pantry Labels
The reason I love using canning jars and pickle jars for food storage is because they have a rubber seal inside that seals air out of the jar. That helps the food stay fresh longer, rather than in the original bags and boxes.
That, and I just love the look of the older canning jar designs.
For the Jar Lids:
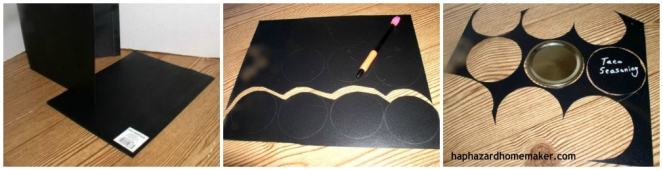
- I opened up the vinyl folder and then cut the front and back apart down the center fold. Carefully cut around the edge of the inside pockets, so that you have flat pieces to work with.
- Using a pencil, draw around the flat lid. I tried using an ink pen first, but it was too difficult for me to see the traced circles. If you are using regular canning jars (opposed to wide-mouth jars and lids), you can get 12 lid circles out of each of the front and back, plus another 4 or 5 from the cut off pocket pieces of vinyl.
- Carefully cut out the circles.
- Shake your paint pen well and often. If you haven’t used one before, be sure to practice a couple of words on scraps of the vinyl to get the feel for the right amount of pressure when writing.
- Start writing, but be sure to allow for the flat lid “borders” that will be under the ring. Allow the paint is dry before handling the labels.
For the Large Jar Labels:
- Determine the length of tape you need, then cut several out at one time so they are all the same length. If you want to take it a
 step farther, use a coin to trace around one side to make rounded corners. Yes, that idea came to me too late.
 - Paint your words on the tape. Let it dry for a short time, so that the paint doesn’t smear when you smooth out the tape on the jar.
- I also spray painted the jars lids that weren’t white, just so they all matched.
See the jar with a black lid in the picture? I did consider painting the half gallon jar lids black. I thought it looked pretty cool. But since all of the gallon jars had white lids, I decided to keep the lids all the same color. (I used a cheap spray paint and applied several light coats)
For the Twine:
The twine isn’t necessary. I just love the looks of it!
I used two pieces of twine about 24″ long on each jar. Hold the two pieces together and loop behind the jar top, under the neck rings. There is a tying technique that insures the bows sit properly.
Who knew!
I discovered that as you are looking at the front of the jar, with the twine wrapped around the neck, take the right strands over the top of the left strands, then pull to the back and up in the center and then tie your bow. Other wise, the bow is crooked. Cut off the tails to the desired length.
You can add a couple of drops of clear-drying glue to the knot to keep it from coming untied.
The Easy DIY Label Reveal
We don’t have much cabinet space in our kitchen, so these shelf units are desperately needed. Although I tried keeping them neat, they always looked cluttered. I guess because of all of the brightly colored food packaging. I am so pleased with the way this turned out.
I didn’t want labels on the front of the quart and pint jars to hide the logos. The jars on the upper left shelf are beans and are easy enough to see what’s in them, even if they didn’t have lid labels. The smaller jars on the other shelves are low enough that I can see the jar top labels.

The store bought canned goods that I do have behind the jars on the lower shelf aren’t as cluttered looking either. Love that!
I was so excited about how everything was coming together, that I rearranged some decorative items and actually went on and purged a few more items. I’ll show you what is behind the curtains, and inside the cupboards another time…after I get everything repainted. Can’t decide on a color.
If you liked this post, please share on Pinterest and Facebook with your family and friends. I’m on both Pinterest and Facebook, so look me up!

Happy Label Making,
Robin

Just made some spice mixes to store in jars. Labeling them tomorrow. Thanks for the great idea!
LikeLike
My pleasure! I’m loving my labeled jars!
LikeLike
This looks amazing, lady! I love it 🙂
LikeLiked by 1 person
Thank you! I love it and it makes me happy when I see it all nice and orderly.
LikeLike