If time, space and energy are keeping you from gardening, then container gardening is just what you need! Once set up, they are so easy to maintain. You will have less weeding and maybe less watering. And plenty of fresh vegetables!
Due to health reasons, if it weren’t for the containers, I could no longer garden. Just a few years ago, I had a market garden that provided vegetables and fruits for 12-15 families weekly for 24 weeks through the growing season. I loved doing it, but was only able to do it for 2 years. At that time, I was using a few containers for eggplants, so I knew large vegetables would grow in them. To enable me to continue gardening, we have transitioned over to all containers for vegetables.
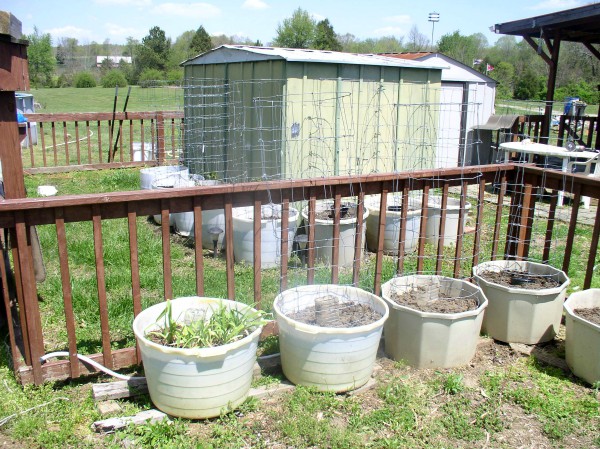
Our Container Garden
We recently made the decision to move several containers to a more accessible location, to make it easier for me to tend to the plants. Our weather has been pretty wacky this spring, so nothing is really planted yet. But soon!
My plan is to give weekly garden updates, and share a few tips and tricks to make gardening easier for you. The weekly update posts will be mostly pictures with descriptions and observations.
This post is pretty wordy, while I explain how we set up our containers. You can do the same thing on whatever size scale suits you and your space. There are a few pictures at the end to show what we are starting with and my game plan for planting.
How to Prepare Containers
The majority of the containers we use originally held cattle feed. Some of the farmers around here sell the empty ones for $5 or so. The other containers are food-grade plastic drums, that generally cost us $8-$10 each. Hubby cuts those in half. We drill four or five drain holes around the outside, an inch or two up from the bottom, so that the soil will hold a little water that will wick up to the plant roots. If the drain holes are in the bottom, the water drains out too fast. Once they are in place, we use pieces of scrap wood to level the containers.
Tip: If you are using large containers like ours, make sure they are in the desired location before filling. They can be moved, but it sure is a pain.
You could use smaller containers, such as 5 gallon buckets and 1 or 2 gallon nursery pots. The problem with smaller containers are that they need more frequent watering.
Filling the Garden Containers
Next we put 3 or 4 clean empty gallon milk jugs (with the lids on) in the bottom of the container. Mainly this is to take up space, so that you don’t need as much soil. When we started filling our containers, we scooped up enough soil from the raised rows in the garden to fill the containers about ⅔ full. We then bought bags of composted manure to mix into the top few inches of the garden soil. We now have a couple of our own compost piles to dig from, to add to the containers as needed.
You might have read somewhere not to use garden soil in containers, because it gets compacted and will be too heavy for the roots to grow. I mulch all of my containers with 3-4″ of grass clippings or hay on top of the soil, and at the end of the growing season, I work that down into the soil. In the spring, I add a couple of inches of compost. My containers are full of good rich soil. If you are starting from scratch, just stir in some grass clippings when filling your containers. If you are only doing a few containers, just buy the bagged potting mix.
Tomatoes and any other tall or vining plants need some support. We used large tomato cages the first couple of years, but have since started making cages out of a roll of leftover woven wire fence. These are easy to make, sturdy enough to handle the weight and can then be flatten to store when not in use.
Watering Tip
I like to partially sink a plastic pot in the center of each pot. If you use 2 nursery pots together, you can twist them to leave very small holes for the water to seep out. Or use a milk jug or juice bottle with very small holes to make a drip system. This is a great way to save on watering, as the water goes right to the roots. When you need to water, just fill the pot or jug and let it slow drip.
I love the pocket hoses for easy handling. Just don’t leave them out in the sun. Even if they did only last me one summer, I’m good with that, just because of not having to man-handle a heavy rubber hose.
Today I spent a few hours removing weeds and loosening the soil, getting the containers ready for planting. It doesn’t look like much now, but when everything is planted and producing, we have more than enough for fresh eating, plus putting some in the freezer.
So here goes with the pictures…


I will be posting weekly updates of how my garden grows, and sharing tips and suggestions to make gardening easier! I would love to see you here!
Thanks for taking the tour,
Robin
PS: Please don’t forget to share! Thanks a bunch!

Thank you for this! I get so little help in the actual garden that I’m thinking this is the way to go for me😙
LikeLike
You are most welcome! Something else that might help for the containers you posted about a month ago…I also have a couple of wading pools from the dollar store that I use for small containers, that I drilled several drain holes on the sides 1″ up from the bottom. Set your smaller containers in the pool, with a little space between them. You won’t have to water them but once or twice a week and then you just need to add water to the pool, and not have to water each plant individually. 🙂
LikeLike
Oh, now that’s smart!
LikeLiked by 1 person
Very cool. I love container gardening. I currently do a combination of a traditional garden (organic,) and container gardening.
LikeLiked by 1 person