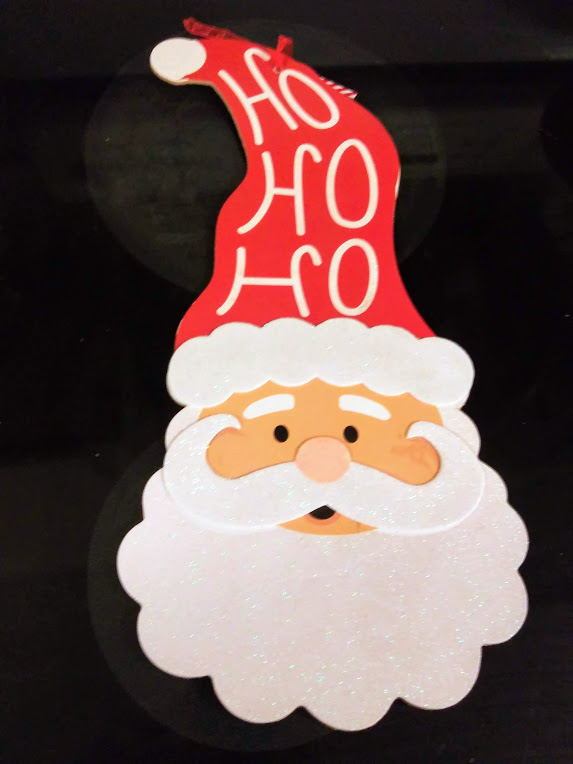
This is a fun craft for a quick door hanger for January after the Christmas decorations come down. It costs me less than $3 to make and is so easy! I bought a Dollar Tree Santa head and a mop head, and I had the other items at home.
I’ve been wanting to make some gnomes for quite awhile, so I was pretty excited when I found a package of 3 pairs of printed men’s socks on clearance for $1 a couple of months ago. I was making 6 craft kits for this project to share. Dollar Tree has some pretty cute fuzzy socks in different colors and prints that would work well, too.
If you can’t find the Santa head shown below, I’ve included a link for a simple 2 page pattern. Print it out and tape the pattern pieces together, then trace it on a piece of foam board from Dollar Tree and cut out. The Santa head is just under 16″ tall.
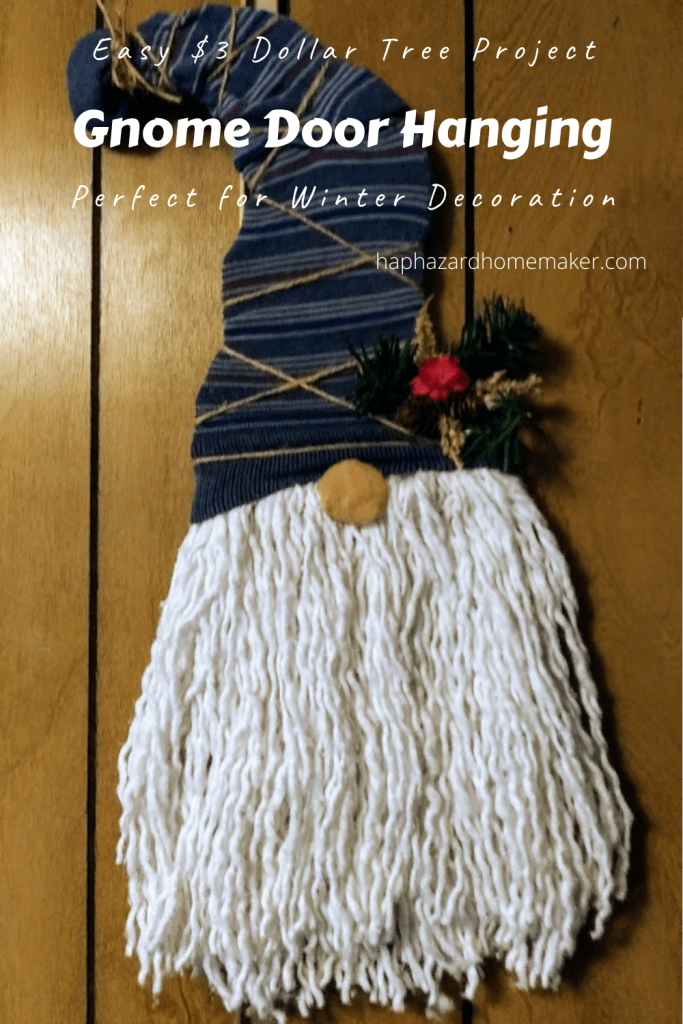
Gnome Door Hanging
Printable Santa head pattern (2 pages)
Supplies:
- Dollar Tree Santa hanging
- Dollar Tree mop head
- Large sock
- 1” ornament for nose (or can use 1” wood bead, or stuffed felt ball) The picture shows the felt circle with a cotton ball inside and the felt carefully gathered and glued on the back side, then glued on the face.
- Twine
- Paper clip
- Greenery for hat decoration
- Hot glue gun and glue
Directions:
NOTE: working with the mop heads is terribly messy, as they shed a LOT and it gets all over your clothes and carpet.
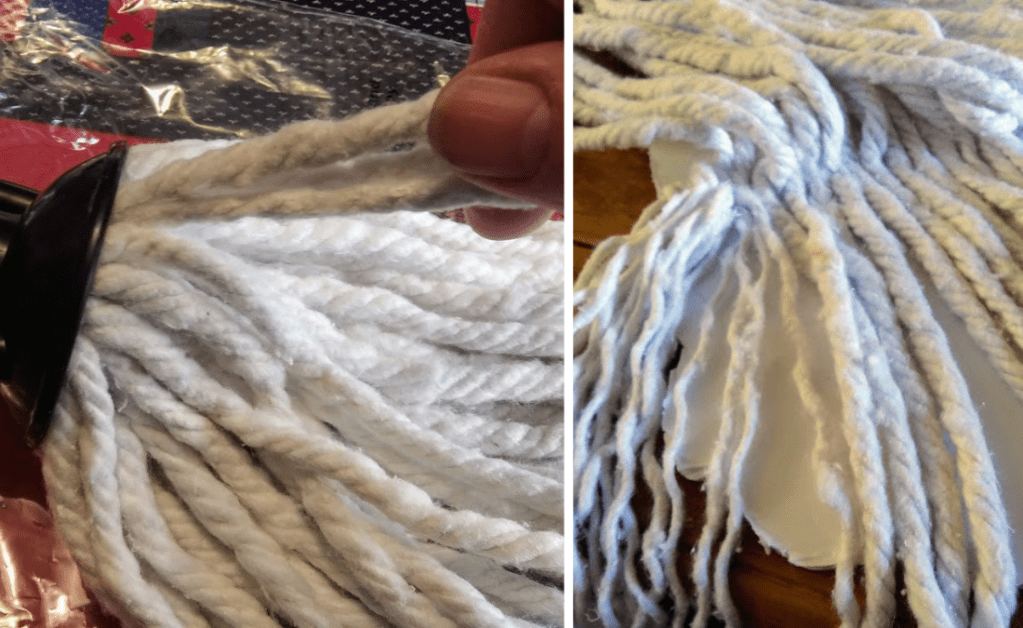
- Starting in the center of the mop head, carefully start pulling out mop strings. Start with 1 at a time until they are loose enough to pull 2 or 3 strands. Left picture above.
- Fold each string in half and hot glue each string fold across the front of the Santa face in a straight line right under the Santa hat brim. See picture on right above. I only used a little more than half of the mop head. Save the rest to make some more Gnomes or Santa heads.
- Once all the strings are glued in place and the glue is dry, un-twist all of the strings. The strings on the left side of the picture on the right above are untwisted compared to the ones on the right side not untwisted.
- At this point, you can put 2 or 3 cotton ball or wadded up napkin in the toe of the sock, if desired.
- Carefully pull the sock down over the top of the Santa head so that it covers the top of the beard strings, and down a little more on the sides. I like to keep the heel of the sock on the right to follow the form of the Santa hat. Apply hot glue under the edge of sock over the top edge of string beard. Glue the sock down in back too.
- Find the center point of the long piece of twine and hot glue it down at the center back edge of the sock/hat. Once the glue is dry, pull the twine ends to either side of the front and start firmly criss-crossing the twine while wrapping around the hat towards the top. At the top, wrap it tightly forming a ball at the top edge of the hat and tie a bow. See photo below for general idea of twine placement.
- Use a paper clip to hook through one of twine crosses on the back for a hanger. Hot glue under all of the meeting points of the twine crosses on the backside.
- Hot glue the nose in place. The ornament is the easiest, but the picture shows a felt circle with a cotton ball inside and the felt carefully gathered and glued on the back side, then glued on the face.
- Hot glue greenery, pinecones, flowers, etc to the lower front side of hat.
Hope you have fun making this! I would love to see photos of your creations in the comments!

Awesome idea! Love it! Gnomes are so cute.
LikeLiked by 1 person
Thanks! I agree….and I got carried away making them. 😅
LikeLiked by 1 person
😂 i would too! Great job!
LikeLike
Adorable!
LikeLiked by 1 person
Thank you 🙂
LikeLiked by 2 people
So cute! 🙂
LikeLiked by 1 person
Thank you 🙂
LikeLiked by 1 person
So darling and inexpensive to boot!!!
LikeLiked by 1 person
Thanks so much! 🙂
LikeLike
Is that an Irish Santa on December 26th?! It’s cute as a button 😊
LikeLiked by 1 person
Thank you 🙂 Not sure about Irish Santa, but they do protect earthly treasures underground. 🙂
LikeLiked by 1 person
This is adorable!!
LikeLiked by 1 person
Awe, thanks a bunch! 🙂
LikeLiked by 1 person